Jira Integration #
With the Jira Integration, Project Managers create a connection between Jira and Portfolio Manager, which pulls Jira Projects into the Scheduled Collection for prioritization, forecasting, and scenario modeling. The scheduling algorithm uses the Jira Time Remaining field to calculate start and finish dates in Portfolio Manager. Once the schedule has been calculated, the integration returns the most up-to-date project planning information to Jira through a manual sync.
| 1 | Start the integration from Scheduled Portfolio View |

To pull in a project with the Jira Integration, navigate to Projects in the left-side navigation. This takes you to Portfolio View in the Scheduled Collection. Projects are added to Packages in this view. Use the toggle to expand a Package.
Select the Add Project field to activate the Add Jira Project button. Project Manager access or above is needed in order to create projects through the integration. The Add Jira Project button opens the integration window where you establish the connection between Portfolio Manager and any of your Jira instances.
| 2 | Jira Issues become Tasks |
| Jira Attribute | Portfolio Manager Property |
|---|---|
| Issue Name | Task Name |
| Assignee | Assignee |
| Description | Notes |
| Issue Key | Custom Task Data Field |
| Project Name | Custom Task Data Field |
| Issue Type | Custom Task Data Field |
| Priority | Custom Task Data Field |
| Epic | Custom Task Data Field |
Through the course of the integration, you’ll be prompted to customize the project set up through filtering and field mapping. When that is completed, each of the incoming issues will be transformed into Portfolio Manager tasks with default attributes applied.
Additionally, the project folder in Portfolio Manager will have a custom project data field for Project Lead that maps to the corresponding field on the Jira Project.
The assignee in Jira will map to a Member or Resource in Portfolio Manager. Resources will be created on your behalf for all Assignable Users in the Jira project if they don’t already exist in Portfolio Manager.
Visit Administration in the left-side navigation to view the number of Resources available and make sure you have enough to complete the project integration. Use the Support & Feedback link in the user menu to request more Resources.
| 3 | Connect to Jira Using OAuth |
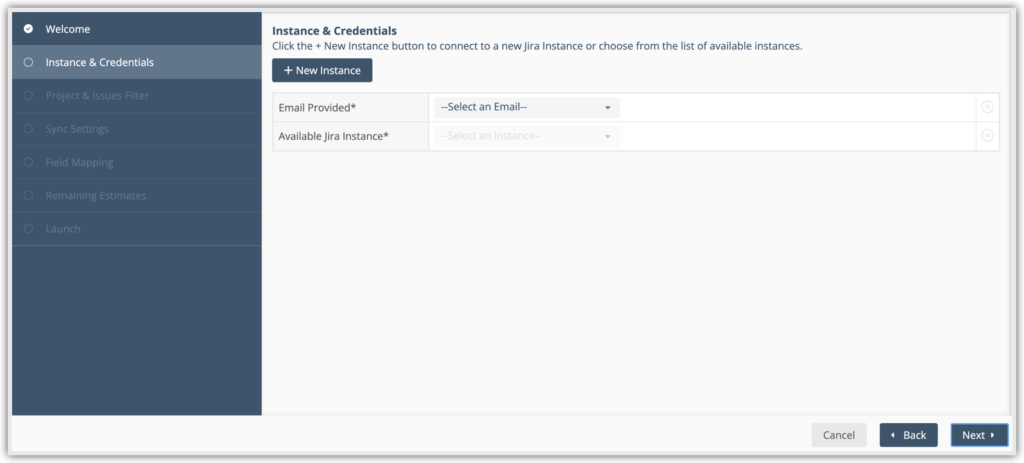
At the Instance and Credentials step, you have the option to add a new instance or connect to one that you had previously selected. You will always need to provide an email address to pull a project in from Jira.
- +New Instance: Connect to your Jira account and choose a new instance. An authorization window will open requesting access to your Atlassian account. Choose your account and select Accept.
- Email Provided: Choose the email address that established the connection.
- Available Jira Instance: If you have previously integrated then those instances will be listed here.
| 4 | Project & Issues Filter |

After connecting to the Jira instance, you are ready to choose a project from the Jira Project drop-down menu. The menu includes all of the projects that you have access to in the connected Jira instance. After you have selected the project, you can set up the following filters:
- Issue Type: Select the Issue Type you want to pull in: Task, Story, Bug, and Epic, or Select All. A task is created for selected Issue Types. Pull in hierarchical issues as tasks to capture estimates or the time tracked for those tasks.
- Issue Status: Select the status of the Issue Type you want to pull in. The available statuses depend on the configuration of your Jira project.
- Parent Issue Key: Manually enter an Issue Key from your Jira project to pull only Issues from there. For example, if you only want to pull issues from a specific epic.
- Include issues created after: Choose a date to include only issues created after that date.
Depending on the filters that you choose, the Issue Count and User Count will update accordingly. The Issue Count in the lower left corner tells you the number of Jira issues that will come in as Portfolio Manager tasks when set up is complete. The User Count shows you a count of how many new users will be pulled in when set up is complete.
Use the “Next” button to save the filters and move to the next step.
| 5 | Sync Settings |
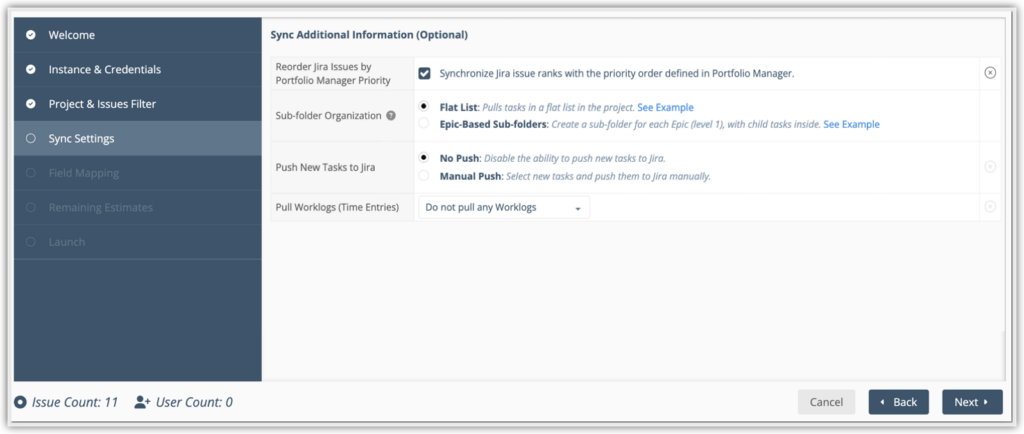
In Sync Settings, you can choose how you want to pull hierarchies and work logs into Portfolio Manager. The following settings are available:
Reorder Jira Issues by Portfolio Manager Priority
This setting will reorder the tasks in your Jira project to reflect the priority order of your tasks in Portfolio Manager. Remember that in Portfolio Manager, tasks are prioritized from top to bottom, with the top being the highest priority and the bottom being the lowest. The setting is enabled by default. Deselect the check box if you do not want to send Portfolio Manager priority order to Jira.
Subfolder Organization
This setting determines how tasks are displayed when you pull them in. Tasks are displayed as a flat list if no Epics or custom hierarchy levels exist. The following options are available:
- Flat list: Pulls tasks in a flat list in the project. Tasks are not sorted into folders.
- Epic-Based Sub-folders: Creates a sub-folder for each Epic (level 1) with their issue (child) tasks inside the folder. If an issue does not belong to an Epic then it resides at the top level (the same level as the folders).
- Hierarchical Sub-folders: Creates a sub-folder for each custom hierarchical issue type. An example would be for level 1 and above, such as for an Initiative, Feature, and Epic, with child items nested within the corresponding type. This option will only display if the instance you have selected is on a Jira Premium or Enterprise subscription.
Important: The subfolder organization is a one-way process after you set up the integration. After integration, you can change a flat list to Epic-Based and change Epic-Based to Hierarchical, but you cannot revert an option to the previous one. To change the subfolder organization, select the Integration button in your project and then select Modify Setup. There, you can modify your selection and save your changes, which take effect the next time you sync.
Push New Tasks to Jira
Create tasks and send them directly to Jira in a synced project. This feature streamlines task management and enables seamless integration between Portfolio Manager and Jira. Select from the following options:
- No Push: The default option. Disable the ability to push new tasks to Jira.
- Manual Push: Select new tasks and push them to Jira manually.
You can also modify this setting anytime through the Jira Integration menu under Modify Setup.
Workflow for Push New Tasks
If you select Manual Push, the expected workflow to properly use it is:
- Proceed to set up Field Mapping and map your required fields (details are later in this lesson).
- Complete the Integration and sync your project.
- Create New Tasks in Portfolio Manager: Add tasks to the synced project as needed.
- In the Properties of each Task, you must enter an Issue Type (in the issue type custom field that was created as part of the integration). The tasks will not be created in Jira if the Issue Type is missing.
- You can also create your assignments and assign them to users. Add an assignment and assign it to a synced Jira user to make them the task owner in Jira when the task is pushed.
- Select the tasks you created and use the drop-down menu under the Jira Integration button. Select Push selected New Tasks to Jira to send the tasks. Alternatively, if you select all tasks, Portfolio Manager will detect any new tasks automatically allowing you to also push them through using the button. The total number of new tasks that will be sent will always be displayed.
Important: During each sync, Jira task descriptions are pulled into the “Note” custom field in Portfolio Manager, and overwrite any edits or additions that were in the “Note” field. Notes, descriptions, and estimates in Portfolio Manager are not pushed to Jira. - Jira assigns an issue key, which appears in Portfolio Manager under the task’s Issue Key field.
You can send up to 50 new tasks. New tasks are created as issues in Jira and their corresponding issue key is pulled into the issue key on the task in Portfolio Manager. Supported Issue Types include:
- Tasks
- Stories
- Bugs
- Epics
- Features and
- Other Level 0 or higher types
Pull Worklogs
The following options are available and will vary depending on your instance:
- Do Not Pull any Worklogs: No Worklogs (Time Entries) are pulled into Portfolio Manager.
- Pull from Jira: Pull Worklogs (Time Entries) from Jira into Portfolio Manager.
- Pull from Tempo Timesheets: Pull Tempo Timesheet entries into Portfolio Manager. This option only displays if Tempo Timesheets is installed on your instance.
- Cost Code: Select a cost code that is applied to Jira time entries in the selected project. This option only displays after you select to pull from either Jira or Tempo Timesheets. Note: After you select a cost code and complete the integration, you cannot change the cost code.
| 6 | Field Mapping |
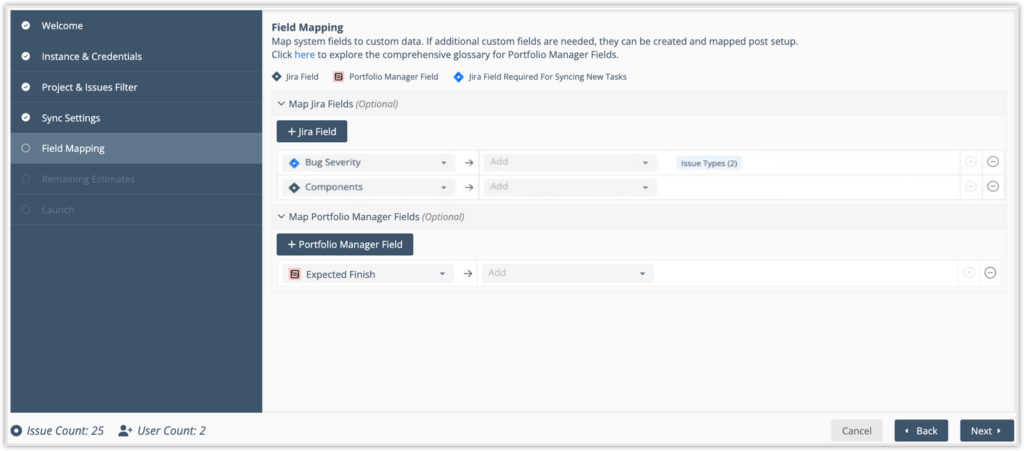
In addition to the attributes that are applied automatically through the integration process there are optional fields that can be mapped through this step.
Select +Jira Field to add additional Jira fields that you would like to map to Portfolio Manager. Select +Portfolio Manager Field to add additional Portfolio Manager fields that you would like to map to Portfolio Manager.
If you choose to pull the issue Due Date from Jira, it can be mapped to either a custom date field that you have created, or to the Target Finish date, which is the deadline in Portfolio Manager. The benefit of mapping to Target Finish is that you will be alerted if you are at risk of missing the Jira Due Date. Learn more about Target Dates and alerting in the Academy. You can also select Enable Two-Way Sync to create a two-way sync between the Jira Due Date and the Portfolio Manager Finish Date.
The remaining options are Portfolio Manager system fields that can be pushed back into Jira custom fields. They can be mapped to existing fields in your project, or you can create new ones for this integration.
- Target Finish is the deadline date in Portfolio Manager. Work can Keep Scheduling past this date or Stop Scheduling. When the Expected Finish is after a Target Finish, schedule bars turn red and alerts identify work that has Schedule Risk.
- Target Start is the date you would like to begin. It could start later, based on the status of higher priority work.
- Expected Start: when you are most likely to begin, based on the status of higher priority work (calculated by the scheduling engine).
- Expected Finish: the date you’re working toward, the likely finish date (calculated by the scheduling engine).
- Latest Finish: how long it could take if worst-case estimates come into play (calculated by the scheduling engine).
- Item Link: the link you get from using the Copy Link button in the Item Panel.
- Work Limit: when you set a Work Limit you cap the number of hours to work on an item.
- Custom Fields, including Text, Multi Picklist, Single Picklist, and Numbers.
If you selected Manual Push for Push New Tasks to Jira, Portfolio Manager highlights the fields required by Jira using a blue icon named Jira Field Required For Syncing New Tasks. These fields must be mapped and filled in Portfolio Manager before pushing tasks.
Select the drop-down menus to view any blue icons. Requires fields that are missing a value will trigger an error, preventing the sync.
During each sync, Jira task descriptions are pulled into the “Note” custom field in Portfolio Manager, and overwrite any edits or additions that were in the “Note” field. Notes, descriptions, and estimates in Portfolio Manager are not pushed to Jira.
When mapping is complete, Next will take you to Remaining Estimates where you will establish the formula for converting Jira’s Time Remaining field into a ranged estimate for the scheduling algorithm.
| 7 | Remaining Estimates |
Time Remaining
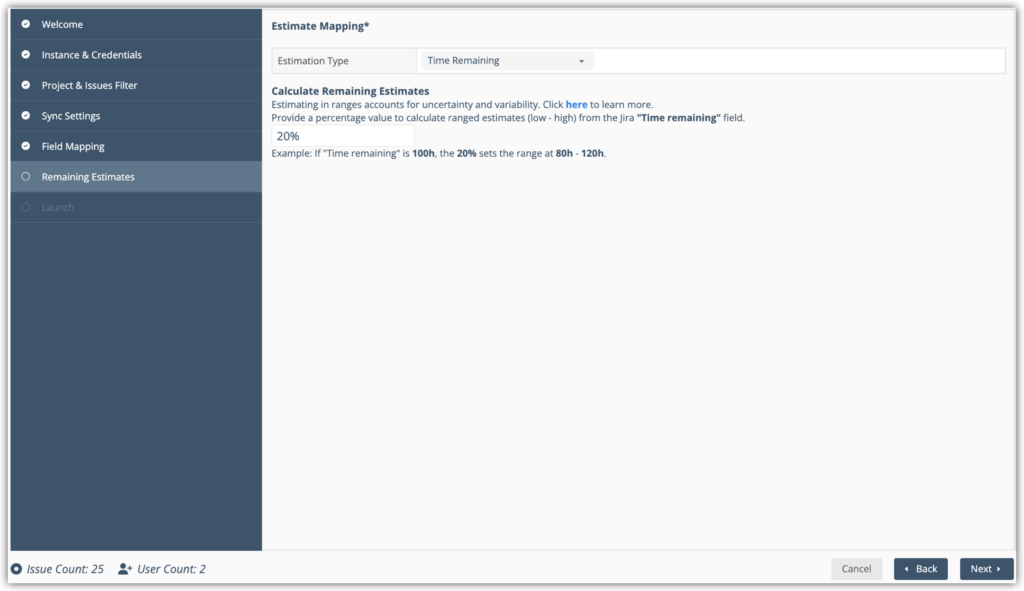
Choose the Estimation Type called Time Remaining to use ranged estimates to statistically calculate your project schedule. Ranged estimates provide a natural way to account for the uncertainty and incorporate it into your plans for a more realistic forecast. In this step you’ll provide a percentage value which will be used to calculate the low and high estimate from the Jira “Time remaining” field.
For example, if “Time remaining” is 100h, 20% would set the range at 80h – 120h.
Learn more in the Remaining Estimate video in the Academy.
Story Points
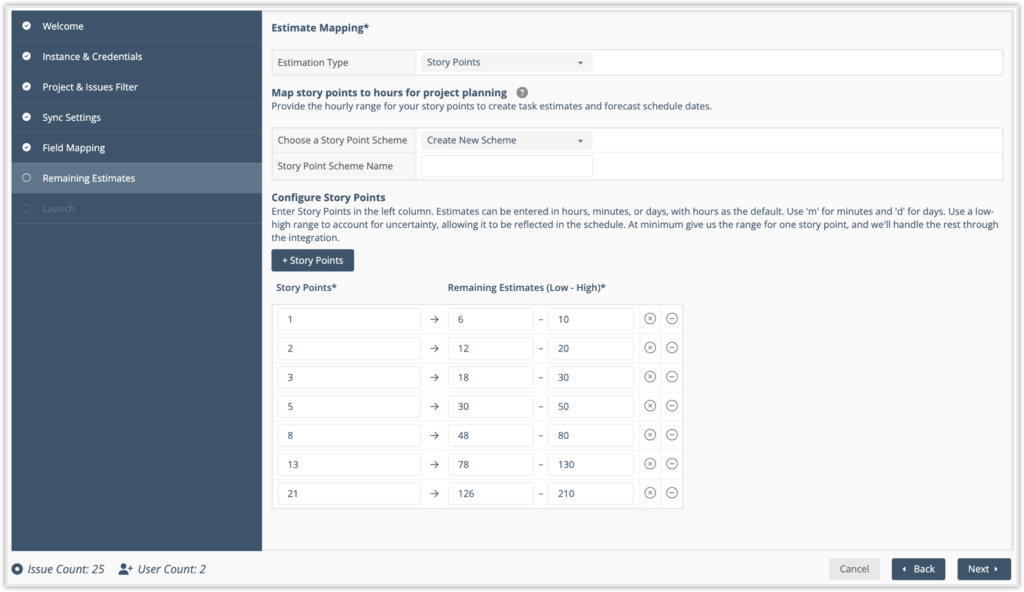
You can also select the Estimation Type drop-down to estimate using Story Points. There are three options for mapping story points:
- Create a new scheme
- Copy an existing scheme
- Use the default scheme
Note: If you decide to use Story Points as your Estimation Type and have selected to Push New Tasks to Jira, then after you sync your project, the story points for your tasks are sent to Jira.
Learn more about Story Points.
| 8 | Launch |
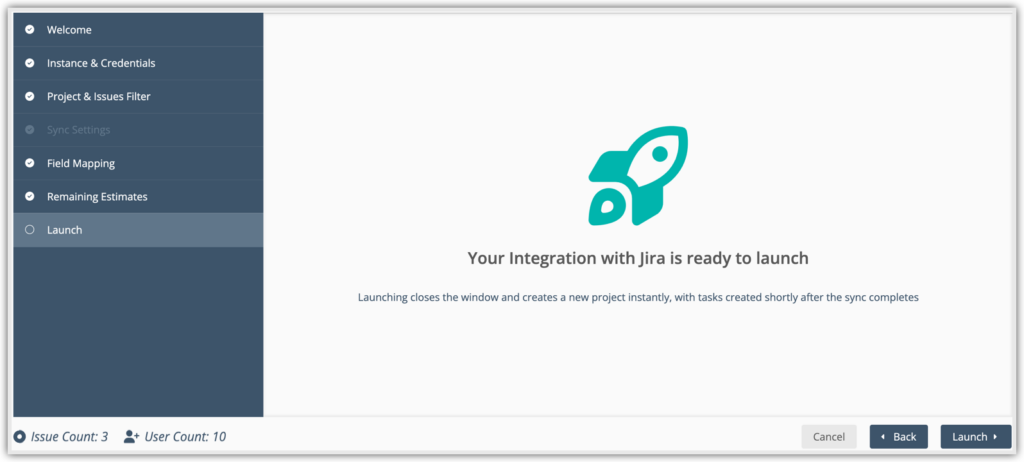
At this last step, Launch closes the integration window and creates a new project instantly, with tasks generated shortly after the sync completes. You may navigate away from the project while the sync is in progress.
| 9 | Sync and Modify Setup |
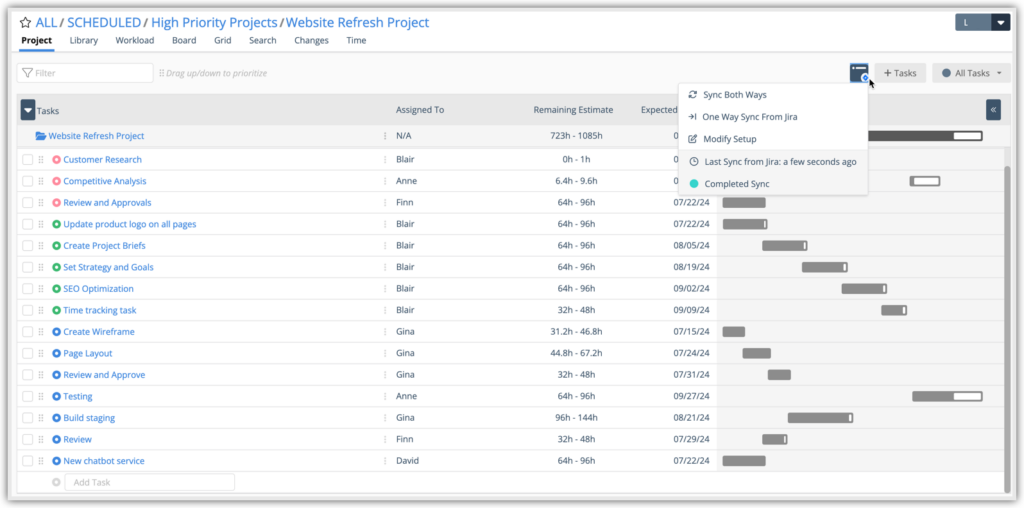
Example of Integration Organized by Flat List
When a project has been pulled in from Jira, it can be synced and modified through the drop-down menu under the Jira Integration button.
- Sync Both Ways: Pull in the latest Jira updates, including new issues, and send Portfolio Manager schedule data back into the Jira Project. Specific updates that can be sent back to Jira include a task status change, re-assignments from one person to another, task priority position (overrides Jira issue rank) and Priority custom fields.
- Push selected New tasks to Jira: If you selected to push new tasks to Jira during your integration set up, this option displays after you create new tasks and select them. New tasks are created in Jira as Issues and their corresponding issue key is pulled into the issue key on the task in Portfolio Manager.
- One Way Sync From Jira: Select to only pull in data from Jira. This sync is recommended if you want to work with the latest data from Jira in Portfolio Manager without sending anything back to your Jira project.
- Modify Setup: this link takes you back to integration setup window where you can edit filters, mapping and remaining estimate calculations. Changes take effect the next time you sync.
- Alerts: You will be alerted when there are sync errors. A few of the more common errors are listed below.
- The workspace doesn’t have enough Resources for Assignable Users in Jira.
- The issue was deleted in Jira, and a task still exists in Portfolio Manager.
- Authentication failed due to invalid credentials.
Important: After you log work in Portfolio Manager and perform a two-way sync, you may experience your Latest Finish dates changing for some tasks on each sync. This behavior is expected because time tracking and estimate data are always a one-way pull from Jira into Portfolio Manager.
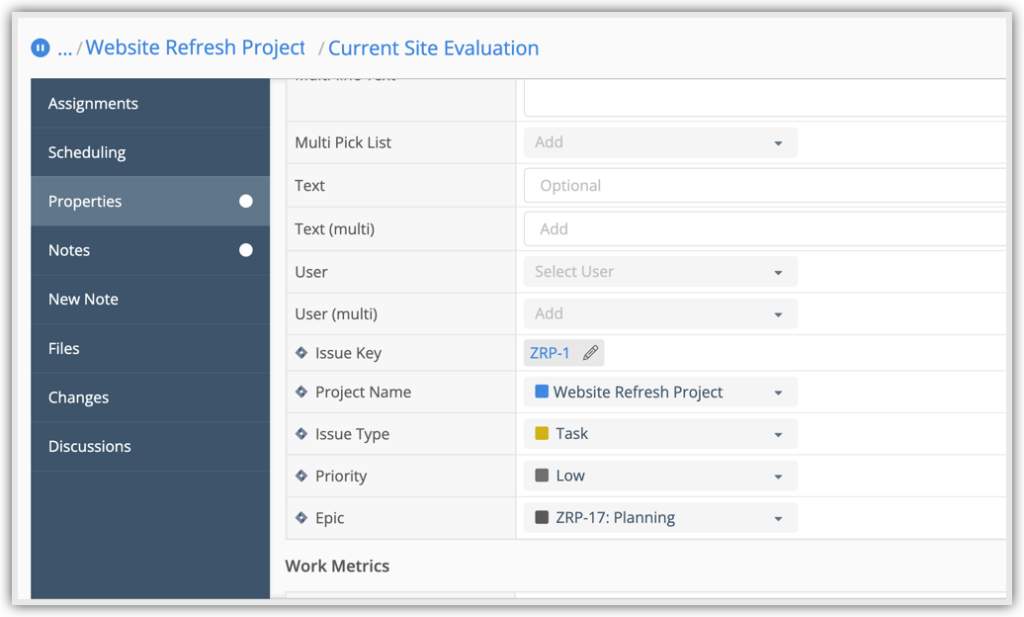
By selecting a task on the list and visiting the Properties, you can view additional data that was pulled in from Jira. You can view the Issue Key and select it to open the issue directly in Jira. Additional information includes the Project Name, Issue Type, Priority, and Epic fields.
Delete Folders or Tasks
You can also delete folders or tasks that have populated in Portfolio Manager. Deleting items in Portfolio Manager does not delete them in Jira and vice-versa. On your next sync, deleted items are re-created in Portfolio Manager if they match the filter criteria. Select the three-dot icon next to a Folder or Task and select Delete Sub-Folder or Task. Re-sync to make these items re-appear on your list.


