Introduction to Schedule Bars
Location: Portfolio View, Package View and Project View
Edit Panel Assignments tab: Tasks
Edit Panel Scheduling tab: Packages, Projects, Sub-Folders & Tasks
| 1 |
Ranged Estimates transform into Schedule Bars # |
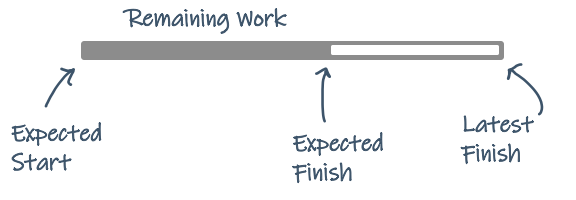
Predictive Scheduling transforms Ranged Estimates into schedule bars representing your Remaining Work. Start and finish dates are calculated using a sophisticated algorithm that takes priorities, dependencies, limits, target dates and team member availability constraints into account while running Monte Carlo simulations on the whole portfolio.
Expected Start: when you are most likely to begin, based on the status of higher priority work
Expected Finish: the date you’re working toward, the likely finish date
Latest Finish: how long it could take if worst case estimates comes into play
The Expected Finish to Latest Finish range is a landing zone that spans 50% confidence (Expected Finish) to 90% confidence (Latest Finish). The difference between these dates captures the Uncertainty in your work.
| 2 |
Why capture Uncertainty? # |
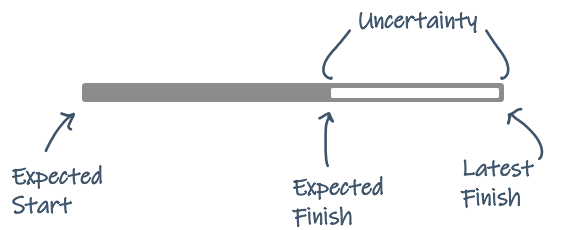
Since estimates are entered as a range, finish dates are predicted as a range: Expected Finish to Latest Finish. Estimating with a best case – worst case range accounts for the variables in your work. When things go well, work is completed in a shorter amount of time. If not, it takes longer. Ranged estimates provide a natural way to capture the uncertainty so it can be incorporated it into your plans for a more realistic schedule.
Capturing Uncertainty empowers everyone to think about the gaps and work together to find solutions.
Identify projects with too much uncertainty (aka, lots of white space) and focus on tasks that need attention.
Use uncertainty to your advantage by using Latest Finish as a promise date for stakeholders.
| 3 |
Target Dates for long-range planning & deadlines # |
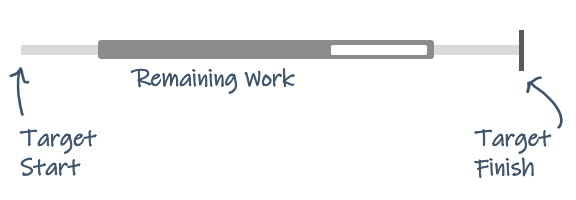
Schedule bars show how Remaining Work is tracking against Target Dates. While Expected Start and Finish dates are calculated and fluidly adapt to change, Target Dates are fixed. They’re added manually to guide Predictive Scheduling so you know what can be accomplished within a given time frame.
Target Start is helpful in long range planning because it ensures that work won’t start earlier than the date you selected. It could start later, based on the status of higher priority work.
Target Finish is the deadline date in LiquidPlanner. Work can Keep Scheduling past this date, or set it to Stop Scheduling. Schedule bars turn red and alerts identify work that’s at risk in real-time so you can get the schedule under control.
Learn more in the Schedule Control track.
| 4 |
Visualize schedule risk well in advance # |
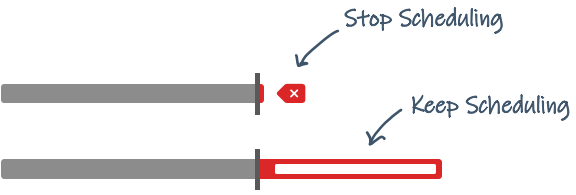
It’s very easy to spot schedule risk because you’ll see red whenever Predictive Scheduling calculates that work is expected to finish after a Target Finish deadline.
If you choose to Stop Scheduling on the Target Finish deadline date, Insights on the Edit Panel display the number of hours that won’t be completed on time. When you elect to Keep Scheduling, the schedule bar and finish dates show how you’re tracking against the target.
Learn more in the lesson about Target Dates.
| 5 |
Reading Schedule Bars # |

Hover over a schedule bar to see the Finish Range (Expected Finish to Latest Finish). If you’re concerned about how far apart those dates are, it’s time to dig in and figure it out. Start by clicking on the schedule bar to open the Edit Panel Scheduling tab where you can see schedule dates, Targets and Insights.
Schedule Status Indicators
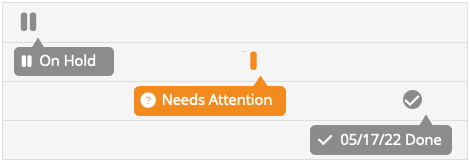
When an item isn’t scheduling, a Schedule Status Indicator is displayed instead of a schedule bar.
On-Hold indicates that an item is not scheduling due to it’s On-Hold schedule status.
Needs Attention indicates that active work is not scheduling. It either needs to be assigned or estimated.
The checkmark indicates an item is Done. Hover over the checkmark to see the date it was marked done.
Learn more in the lessons about Task Status and Marking Work Done.


