LiquidPlanner has multiple email integration features to help you communicate more efficiently with your team and get new tasks into LiquidPlanner.
Set Email Security Settings
Email Integration settings are found via your User Menu > Settings > Workspace Settings > Email Integration. In order to take advantage of our inbound email features, be sure that your email integration setting is enabled at the desired security level:
- Disabled – This will prevent tasks or comments from being emailed into your workspace. An email will be sent notifying your workspace members.
- Low Security – Anyone can email tasks or comments into your workspace. Email that does not come from the same email address as a workspace member will be recorded as coming from ‘Unassigned’.
- High Security – Only workspace members can email into your workspace. Email from anyone that is not linked to a workspace member will be ignored.
Find an Item’s Email Address
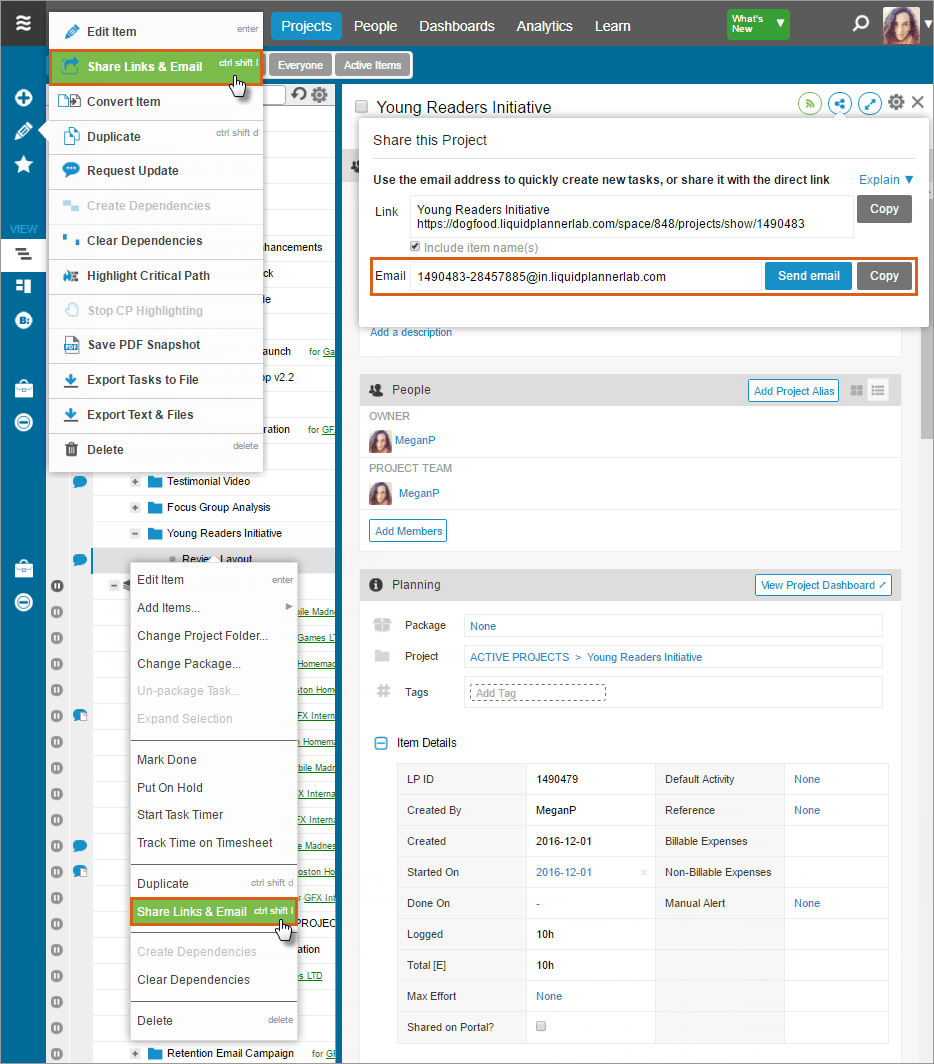
In order to email information into LiquidPlanner, you’ll need the email address of the target plan item. Every plan item in LiquidPlanner has its own unique email address. Once your plan item is selected, you can obtain the email address in one of the following ways:
- Edit Panel > Share Links & Email button

- Edit Menu > Share Links & Email
- Right-click menu > Share Links & Email

Create Tasks Via Email
Start by getting the email address of the target container in LiquidPlanner. This can be the address of the workspace, package, project, or sub-folder.
Once you’ve obtained the container’s address, either click Send email to create a new message in your default email program or copy the address to your clipboard. (If you intend to create new tasks frequently in the same container, you’ll want to store the container address as an email contact.)
- Fill in the “To:” line of your new or forwarded email with the address of the target container.
- Add the task name to the “Subject” line. Optional formatting can be added only for owner, estimate, tag or task custom field by using the format: task custom field name*task custom field value. (e.g. Build widget, Charles, 3h-5h, #S53, “Custom Status”*”In Progress”).
- Add content to the body of the email.
- Attach files as necessary.
- Send.
The new task’s edit panel will be populated with information from the email subject line. The body of the email will show up in the Notes section of the new task’s Edit Panel. Attachments will show up in the Documents section. The user name of the member who sent the email will be in the Created By field. If the email came from an address that is not associated with a LiquidPlanner log in, “unassigned” will appear in that field.
Email Comments Or Files
Email Comments or Files to an existing task
- Obtain the task’s address
- Either click Send email or paste the task address into the “To” or “cc” line of your email message. (Note: you can email to only one task at a time.)
- Add content to the body of the email.
- Attach files as necessary.
- Send.
The body of the email will show up as a Comment on that task. If a tag was included in the body of the email (#tag), that tag will be added to the plan items’ edit panel. Attachments will show up in the Documents section of the task’s Edit Panel.
Email Comments or Files to an existing Project, Sub-Folder or Package
- Obtain the folder or package address
- Paste the folder or package address into the “To” or “cc” line of your email message, then add “re” to the front of it. For example, if the container address is this: 2141200-34e13b4f@in.liquidplanner.com, then your email should be addressed to this: re2141200-34e13b4f@in.liquidplanner.com (Note: you can email to only one folder or package at a time.)
- Add content to the body of the email.
- Attach files as necessary.
- Send.
The body of the email will show up as a Comment on that folder or package. If a tag was included in the body of the email (#tag), that tag will be added to the container’s edit panel. Attachments will appear in the Documents section of the Edit Panel.
Add Comments From An Email Thread
If you’ll be sending an email thread into LiquidPlanner either from a Reply email or Forwarded email, decide whether the entire thread should show up in the Comments section or if only the most recent reply should be included in the comment.
- Use “RE:” at the beginning of the email Subject line to have only the most recent reply emailed in as a comment. For example, an email thread with the Subject line RE: Annual Report will post only the most recent reply as a comment.
- Omit “RE:” at the beginning of the email Subject line if the entire thread should be displayed as a comment. For example, an email thread with the Subject line RE: Annual Report, should have the “RE:” prefix removed in order for the entire email thread to be displayed as a comment. In this example, the Subject line could simply be Annual Report.
Receiving Email Notifications
LiquidPlanner offers two type of email notifications:
DAILY DIGEST emails are sent to you on workdays prior to your earliest start time so you can begin each day knowing what tasks you have scheduled for the day and what you have coming up in the rest of your week. The Daily Digest also informs you of the progress you’ve already made by showing you a visual of your hours logged and tasks completed for the current week.
On Mondays mornings, you’ll receive a special edition Daily Digest that includes a summary of the hours logged, tasks completed and the comments made in the previous week as well as a reminder if you forgot to submit last week’s timesheet.
This notification is sent on workdays only by default, but if you’d rather not get this notification at all, just set the frequency to ‘never’.
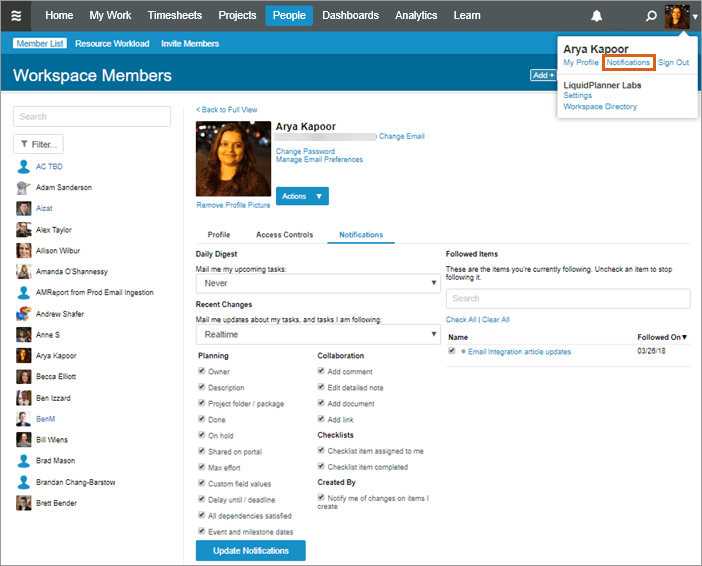
RECENT CHANGE NOTIFICATIONS are sent when edits are made to plan items you own, plan items that you follow, and checklist items that you own. They are sent only when the edits are made by other people. For obvious reasons, we don’t notify you of changes that you make yourself.
To set your notification preferences go to your User Menu > Notifications:

If you find that you aren’t receiving your email notifications as expected, please refer to the advice in our Notification Settings help article.
Reply To Email Notifications
When you are notified about a comment, you can reply to the comment via the notification email. The content of your reply email will be added to that plan item in LiquidPlanner.
- For Realtime notifications, which include only one plan item per notification, you can use the Reply link within the body of the notification or you can simply use your email client Reply feature.
- A bonus of Realtime notifications is that you can use your email client to reply to a notification even when it’s not a comment that you are being notified about.

