There are two ways to model wait time in LiquidPlanner. Both methods free up your resources so they can work on something else during the wait period.
Which method to choose?
- Using Wait Time: When time spent waiting shouldn’t be included in a project’s remaining effort, then applying wait time to a dependency is the way to go. Set the number of days to wait, and LiquidPlanner will count them down automatically.
- Using Virtual Members: When the hours or costs associated with waiting need to be accounted for in the project roll up, using a task assigned to a virtual member is recommended.
Both methods are described in detail below.
Adding Wait Time to a Dependency
You may have a task that cannot begin until a certain number of days have passed since another task was completed. In this case, set a delay on the dependency, or wait time. This is helpful when you’re waiting on client feedback or for a machine to produce a part and you don’t want that “wait time” or “lag” to roll up to the remaining effort on your project.
To set a wait time on an existing dependency, go the Dependencies section of the Edit Panel for either task in the dependency. In the “Wait Time” field, select the number of days or business days you want to delay the dependency.
- “Days” are calendar days (includes weekend days)
- “Week Days” are Monday through Friday (excludes weekend days)
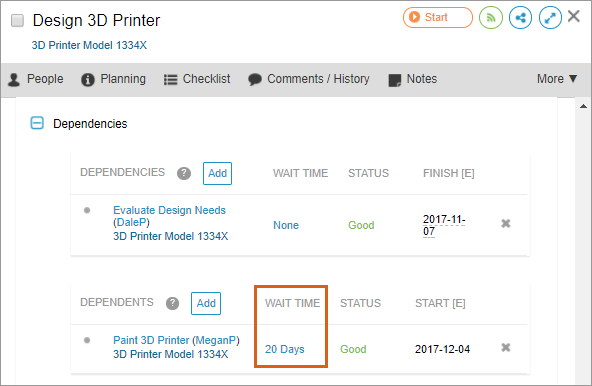
Take a look at the example below. Nadia and Megan are designing and painting a 3D printer. After Nadia designs the printer, she needs to send it off to be manufactured before Megan can paint it. Nadia knows this process will take at least 20 days, so she will set the wait time on the “Design 3D Printer/Paint 3D Printer” dependency relationship to 20 days:

Now, the “Paint 3D Printer” task will not be scheduled to start until 20 days after the “Design 3D Printer” task has been completed.
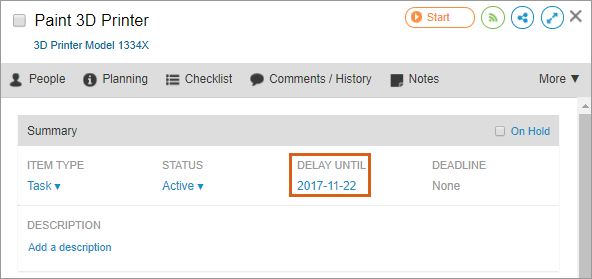
When the “Design 3D Printer” task is marked done, the dependency is satisfied and LiquidPlanner will begin counting down the 20 days of wait time. LiquidPlanner uses the number of days entered in the dependency Wait Time field and sets a Delay Until date on the subsequent task. This is why the delay until icon (arrow) is displaying in front of the schedule bar for the “Print 3D Printer” task below. Once 20 days have passed, Megan will be scheduled to start this task if she has no other higher priority work.

If you need to change the wait time duration after the predecessor task has been marked done, you can do so by selecting a new date in the Delay Until field of the edit panel.

Using a Task Assigned to a Virtual Member
When effort or costs associated with wait time need to be accounted for in the project roll up, then create a task to represent the wait time, estimate the effort to model the wait time between tasks, and connect tasks with dependencies as necessary. Create a virtual member that will own the wait time task.
Overdrive Scheduling can be handy to model a period of idle wait time, if you will have multiple wait time tasks occurring simultaneously, which are also assigned to the same virtual resource.
In the example below, the Manufacture 3D Printer task is forcing a delay between the Design 3D Printer and Paint 3D Printer tasks. The Manufacture 3D Printer task is owned by a virtual member called “Machine” and the effort for the task is rolling up to the project level.

A real member in the workspace needs to log progress on behalf of the virtual member and mark the task done when wait time is complete.
Related Articles

