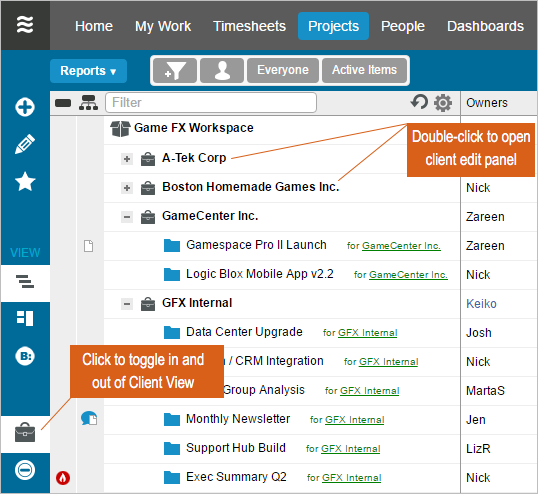
Client View is where you can see all of your projects grouped together by Client. You don’t have the clutter of task detail here; it’s just a nice clean look at the entire portfolio of projects in your workspace.
Using Client View
To enter Client View, start on the Projects tab and click the Client View button in the left-hand navigation. That button will turn white to signify that you are in Client View. Click the button again to return to the project plan.

- Clients are listed alphabetically, while projects within a client are listed in priority order.
- Client View is the only place you see the client edit panel. To edit an existing client, double-click on the client name to open the edit panel. Use the description, notes or comments to store information about this client.
- When adding a new client via the Add menu, click “Add and View” to be toggled into Client View automatically.
- You can’t drag and drop in Client View. To move a project into a different client, double-click to open the project edit panel and use the Client picker.
- To see the tasks for a specific project, select the project and then click the yellow open icon that appears next to it. This will switch you out of Client View and back to the normal Timeline View, filtered down to just that specific project.
- You can’t add new tasks or do other scheduling work in Client View. For that, you must toggle back to the projects mode by clicking on the yellow Client View button.
Use Client View along with the Project Workload report to understand how resources are allocated across all projects in a client portfolio. Simply open the Project Workload report from Client View and select a Client.
Print Client View to PDF
The Client View is a great way to share a high-level view of your project portfolio with somebody who is not a workspace member. You can see various metrics of your choice for each project, including the Client level roll-ups. Run a PDF Snapshot to save this view:
- Start by exposing the columns that you’d like to capture in the printout.
- Then go to the Edit Menu > Save PDF Snapshot.

