Department VP: “How’s it going with the Apollo Project?”
Project Manager: “We’re a little behind right now, but I’m confident that it will be fine.”
Department VP: “And by fine, you mean late.”
As a PM, you’ve most certainly heard that you should be managing the “iron triangle” or the “triple constraints” of a project, which include:
- Scope – what needs to get done.
- Schedule – when it needs to get done.
- Budget – how much it will cost.
In a perfect world, project managers would be able to deliver on the agreed upon timeline, budget, and scope for their projects 100 percent of the time. In reality, we know that this pretty much never happens.
PMs oftentimes have very little direct authority to control these constraints. Sometimes an executive or a customer mandates an aggressive finish date, leaving your project team no choice but to comply. Other times, you run into a technical snag, which can add tons of hours or put the project way over budget. What’s a PM to do? Well, the short answer is: Decide what matters most.
Deciding which aspects of the project are most important to its success helps you understand what risks to look out for and what parts of the project you can adjust to put you back on track. Given that risk can be introduced for a myriad of reasons, you need to consider which of your project’s constraints are fixed and which are variable.
For example, Joe is an IT Project Manager at a growing company. He’s managing a multi-million dollar project to build a new data center by February 1. He knows that this date is fixed and he also knows that his executive stakeholders want him to stay within budget. So when the schedule is flashing red because he’s not expected to finish the buildout on time, Joe might need to adjust the scope of the project in order to successfully meet the time and budgetary constraints.
Of course, this example is oversimplified. There are always limits to how much you can adjust any constraint before affecting quality, but it illustrates the need to pick two constraints: a fixed constraint to anchor to and another that you can sacrifice on. As the project progresses and new information becomes available, you can and should adjust your anchors.
So, with your fixed constraints in mind, let’s use data to identify three types of risks in LiquidPlanner: Scope, Schedule and Budget.
Identify Scope Risk
Defining what is required for your project is not always easy. However, to make sure that you’ve minimized scope risk as much as possible, you need a clearly defined set of deliverables, objectives and, of course, scope. Once you’ve clearly defined the project and entered estimates for the work, LiquidPlanner can help you quantify scope and monitor how changes in effort are affecting the outcome of your project.
Here are two ways to surface data that will help you identify scope risks:
- Filtering in the Timeline View
- Building a Risks Dashboard
Filtering in the Timeline View
Monitoring your project plan on the Projects tab can tell you a lot about scope. There are a few specific things to look for when trying to identify scope risk:
- Unestimated work
- Work with high uncertainty
- Work that goes over the Max Effort.
Checking for unestimated work
Before kicking off your project, you’ll want to make sure that every task within the project has an estimate. LiquidPlanner has a pre-built status filter that will narrow down your plan to just the items that have no remaining effort. To see this, Filter by Status > Zero Work Remaining.
Skim the plan for any task that has a [ ? ] for unestimated effort, and follow up with the task owner by adding a comment or by using the Request Update feature.

As the project progresses, you’ll want to use the Zero Work Remaining filter to ensure that your team is continuing to update their work. If an active task shows that there is 0h – 0h of work remaining, it might be because all of the work is complete and the task owner is waiting for verification to mark the task done. Or, it could be that the task is taking longer than anticipated and the task owner has forgotten to update the estimate.
As the project manager, you’ll need to touch base with the task owner to find out the status of the task and ask them to update the estimate to reflect the true amount of work remaining, even if it is more than was initially expected.
Monitoring work with high uncertainty
Throughout the lifespan of your project, you’ll also want to keep your eye out for any tasks that have a very wide range for the estimate. The best way to do this is to filter down to the active items within your project and skim the Remaining Effort column for any wide estimates.
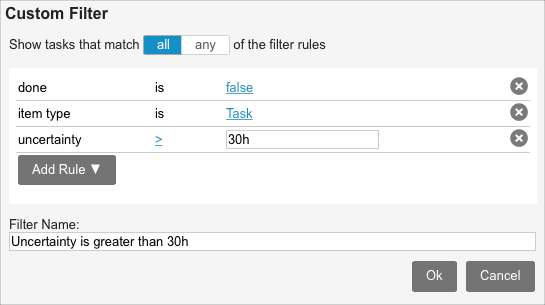
If there is an hourly amount that you can define as a threshold for a task’s uncertainty, given the overall scale of your project, you can create a custom status filter with a rule for “uncertainty.” For example, you could add a rule where “uncertainty > 30h.” This will filter your plan to any task that has a gap between the best case and worst case estimate that is greater than 30 hours.

What counts as a reasonable estimate? We define a reasonable estimate as one that you’re 80 percent confident in making. Sometimes, an estimate of 10 – 50 hours is the best possible estimate given early stage information at the start of the project; but these wide-ranging estimates are the ones you want to pay special attention to. As soon as more work gets done, team members should update the remaining work estimates to reflect progress and diminishing risk. Then ask yourself: Does the gap of uncertainty narrow as time goes on? If not, you’ll need to find out from the task owner why there is still a high level of uncertainty and what they need from you and the team. Perhaps they’ve run into a technical snag, or they’re lacking the necessary resources, or the task’s scope is underspecified.
Monitoring Max Effort alerts
Setting a Max Effort on your project will ensure that you’ll be alerted if you’re approaching or have exceeded a certain number of hours.

Expose the Max Effort column and Filter by Status > Flagged to narrow down your project plan to only items with alerts. The Max Effort alert will appear in the edit panel.
If scope is a fixed constraint of your project and you need to stay within an hourly budget, you can set a Max Effort value on sub-folders or tasks based on the total expected effort, or Total[E], for that item. This way, you’ll be alerted of risks well before the entire project is in jeopardy.
Building a Scope Risk Dashboard
Start by thinking about your audience and then build your dashboard to present the most important information for those viewers.
- On the Dashboards tab, click + Dashboard.
- Give your dashboard a title, like “Apollo Project Risks.”
- Click + Widget.

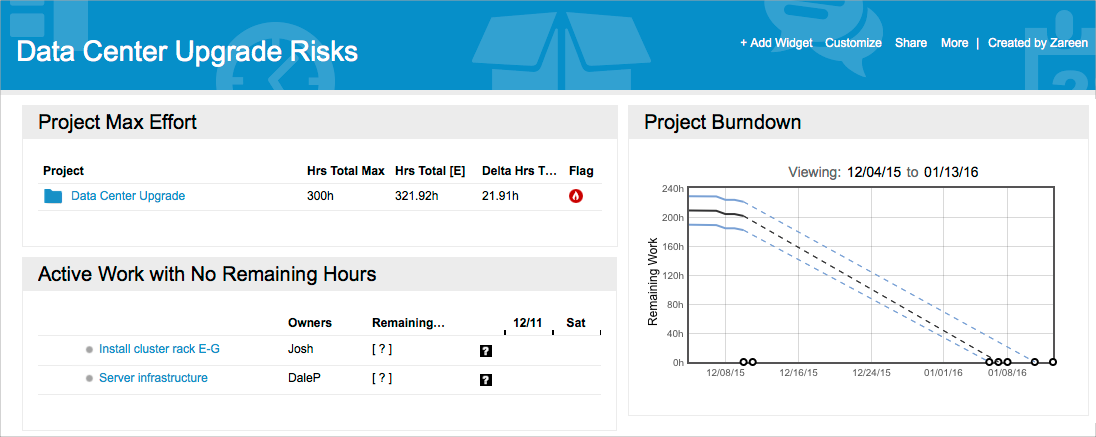
The following widgets are helpful to have on a scope risk dashboard:
- Analytics Table – filtered to a single project, filtered to All Items, row type set to project, showing Max Effort, Hrs Total [E] and Delta Max Effort.
- Projects View – filtered to a single project, filtered by Zero Work Remaining, plan depth set to Full Plan.
- Trend Chart – location set to a single project, showing Remaining Trend (burn down) or Total Trend.
Identify Schedule Risk
When PMs hear the word “schedule” they often think of calendar dates and manual Gantt charts. While dates and durations are a fundamental part of the plan, at LiquidPlanner we believe that people are at the center of every project. Schedules should be built off of what resources are doing, not dates.
You might be asking yourself, “But how do I control my schedule?” or “How can I change the finish date of my project?” You can do both things by managing your priorities and your resources, not by fiddling around with dates.
Remember that your schedule in LiquidPlanner is resource-based, meaning the prioritized set of work gets scheduled based on the assigned resource’s availability to do it. This methodology is more realistic than duration-based project management systems because you will always know how much work can reliably get done and when it will be finished. No amount of manual date manipulation can tell you that. With LiquidPlanner’s dynamic scheduling capabilities, you can focus on what matters: actually monitoring projects and addressing risks in the plan. So let’s talk more about that.
Here are three ways to surface data that will help you identify schedule risks:
- Timeline View
- Building a Risks Dashboard
- Delta Deadline in Analytics
Make sure you’ve implemented our best practices for getting an accurate schedule before you move on to developing a risk mitigation strategy.
Using the Timeline View
If your project’s schedule bar turns red, that means it won’t be completed by the deadline unless you take action. Expand the project so you can see exactly which task is pushing the project’s expected finish date past the deadline and pay special attention to the alerts that you see.

If a task is 98 percent likely to finish after the deadline date, you’ll see an orange warning alert. Given the current remaining effort, it’s still possible that the task will be completed on time; but any delay in progress, or scope creep could put the entire project at risk. If a task is 90 percent likely to finish after the deadline date, you’ll see a red flame alert. The task’s schedule bar will turn red, and the project will show the same alerts. LiquidPlanner starts using red alerts when the 90 percent finish date is at risk because, if the task plays out according to the worst case scenario, the entire project won’t be completed on time.
An even more grim scenario is if the Finish[E] date is past the deadline. This means that the task is less than 50 percent likely to be completed before the deadline.
To find out which finish date is triggering the alert, look at the alert message in the edit panel. If you want to dig a little deeper, you can use a status filter to narrow the plan down to “Deadline at Risk” items, or use Critical Path filtering to get more information.
Any time you see red in the schedule, consider risk mitigation strategies and employ the option that makes most sense for that project. First, confer with the task owners of at-risk items to make sure that they’ve been logging their progress and that their remaining estimates are realistic. If those two things check out, then you might need to reprioritize work, reassign work to a different resource, cut scope or renegotiate your deadline.
Building a Schedule Risk Dashboard
Building a dashboard for the specific purpose of surfacing at-risk work can be helpful if you’re managing multiple projects or initiatives. You can also build a risks dashboard to serve as your own custom view of an individual project’s finish dates, deadlines and alerts. Start by identifying your audience and then build your dashboard to present the most important information for those viewers.
- On the Dashboards tab, click + Dashboard.
- Give your dashboard a title, like “Apollo Project Risks.”
- Click + Widget.
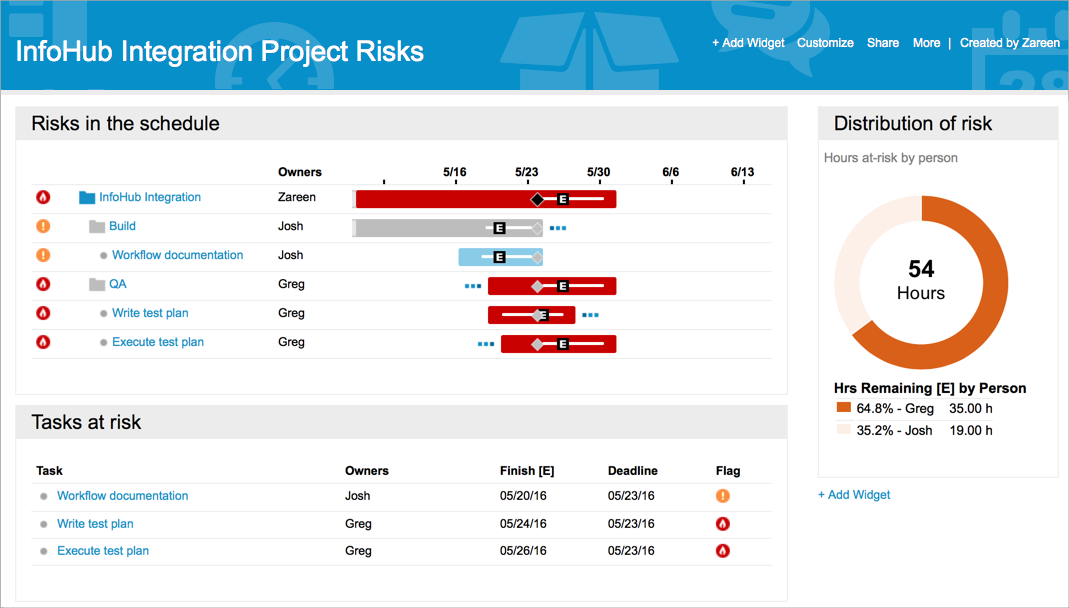
The following widgets are helpful to have on a schedule risk dashboard:
- Analytics Table – filtered to a single project; filtered to Deadline at Risk task status; row type set to task; showing Owners, Finish [E], Deadline and Flag.
- Donut Chart – filtered to a single project, filtered to Deadline at Risk task status, ring emphasis set to Person, metric set to Hrs Remaining [E].
- Projects View – filtered to a single project, filtered to Deadline at Risk task status, plan depth set to Full Plan.
In the following dashboard, you can see all at-risk tasks in the table and the distribution of at-risk hours across the project in the donut chart. The donut also counts the total number of hours that are at risk within the project.

Using the Delta Deadline Calculation in Analytics
If you have a deadline date set for your project, LiquidPlanner can tell you how far off your 90 percent finish date is from the deadline. Delta Deadline is a calculation that is available in Analytics.
- On the Analytics tab, click Project Report and select Project Roll-Up.
- Click the columns button and select Finish [90%], Deadline, and Delta Deadline.
- Change the date range to All Dates.
- To see data for a single project, click the filter icon and Filter by Project.

A negative number in the Delta Deadline column means your project should finish early (high five!), while a positive number is the number of days the project is expected to be late (womp, womp).
Once you have the report set up the way you want it, make sure to title it and save it to your Report Library so that you can run it quickly in the future.
You can also expose the delta deadline column in an Analytics Table widget on a dashboard.
Assess Budget Risk
In order to reliably answer the question, “Is my project on budget?,” you’ll need to use features in LiquidPlanner like activities, rate rules, contract value, and/or expenses. If you have an initial project plan in place, which includes assigned resources and ranged effort estimates, you can get an idea of what your estimated net profit will be before even starting your project.
LiquidPlanner uses the billing and pay rules you’ve set up and applies them to the hours you’ve estimated to give you a sense for how much your labor costs and billable earnings will be. Your effort estimates will probably change as the project progresses. But since LiquidPlanner always runs these calculations in the background, you’ll be able to instantly see how changes in scope are affecting your bottom line.
The best way of identifying budget risks is by running a Project Roll-up Report in Analytics.
Project Financials in Analytics
- Go to the Analytics tab.
- Under New Reports, click Project Report and select Project Roll-up.
- Filter by Project and select your specific project.
- Change the Date Filter to All Dates.
- Click on the Columns button to expose the following columns in your report:
-
$ Pay Total [E]: Gives you the total labor cost of the work being done on the project.
-
$ Total Billable [E]: Gives you the amount you should earn from the work done on the project.
-
$ Delta Bill vs Pay: Shows profit or loss to the bottom line.
-

If the $ Delta Bill vs Pay field is a positive number, your project will be profitable.
Once you’ve determined how much you should be making based on your estimated hours for the project ($ Total Billable [E]), you can set a budget and enter that fixed number in the Contract Value field for the project.
From time-to-time, you’ll want to compare your current expected total billable to the contract value amount to make sure that you won’t be billing your client for more than you promised them. Not to fear, Analytics will do the heavy-lifting for you! The column titled $ Contact Value vs Bill, will tell you the difference between what you promised to a client and how much you’re expected to charge them. So if you want to stay under budget, you’ll need to make sure that this value is a positive number.

If your contracted amount includes non-labor hours or other costs that the client will incur, your team can track those with the Expenses feature.
Note: The Expenses feature is available with the Enterprise plan only. For additional pricing plan details, or to upgrade, please see our pricing page.

The total expenses entered on each task will roll up to your project. You can see these non-labor costs alongside your other financial calculations by exposing these columns in a Project Roll-up report. Learn more about reporting on these calculations in the Expenses article.

