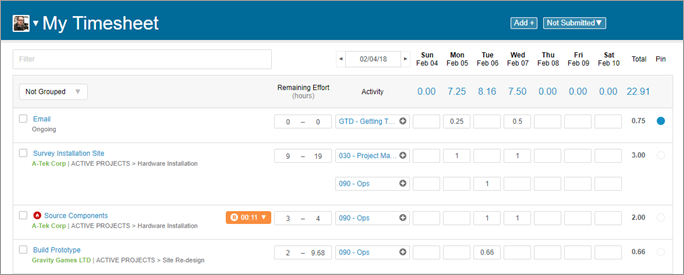
Timesheets are fully integrated with your LiquidPlanner workspace. They allow your team to track actual hours worked against any task, event, or milestone. As time is tracked, a task’s remaining effort estimate is decremented, which updates the schedule.
Each workspace member has a personal timesheet. Workspace managers can review and export timesheet data for all members.
The start of a timesheet period is determined by the Week Start setting on your workspace settings page.
Which Items Appear on the Timesheet
To view your current timesheet, navigate to the Timesheets tab. Your timesheet is auto-populated with items assigned to you that meet at least one of the following criteria:
- Tasks with active or paused timers- There is a timer (running or stopped) with time accumulated for this task. If you have any tasks with a running or stopped timer, these tasks will appear on your timesheet.
- Pinned task – A pinned task shows up on all subsequent timesheets until the task has been unpinned.
- Upcoming task – Scheduled to start in the next 7 days.
- Event or milestone – Occurring during the current timesheet period.
- Recently done – Your task or assignment was recently marked done.
Other than pinning and unpinning tasks, you cannot remove items from your timesheet. Items will drop off automatically once they no longer match the above criteria.

Here are some tips for using the timesheet:
- To move backward or forward in time to your other timesheets, click on the date picker or the backward/forward arrows (the date button displays the start date of the current week).
- For members with Manager level access and above, the name is a member-picker which allows the user to view other members’ timesheet in Timesheet Review mode.
- Click Add and then select Find Existing Item to locate a task from your plan to add it to your timesheet. Track time to it immediately, or use a pin to keep it on your timesheet.
- Use the Quick Filter field to locate timesheet items by name. Terms that you enter in this field will bring up any matching results from the task name, client, package, project or sub-folder name.
Track Time on Your Timesheet
- From the timesheet, you can track time in any of the following units: minutes, hours, days or even weeks (e.g. 480m, 8h, 1d, .2w). You can also enter time in hh:mm format (e.g. 4:30).
- The timesheet will display logged time in hours.
- Time entry notations can be typed into the Timesheet note box. These notations will be captured in a timesheet export.
- You have the option to enter multiple time entries with different activities to a task on a given date. Just click the + icon to the right of the Activity box, and you’ll see a window that will allow you to select the new activity. This will add a new row that will allow you to add additional time to this task.

Edit Previous Time Entries
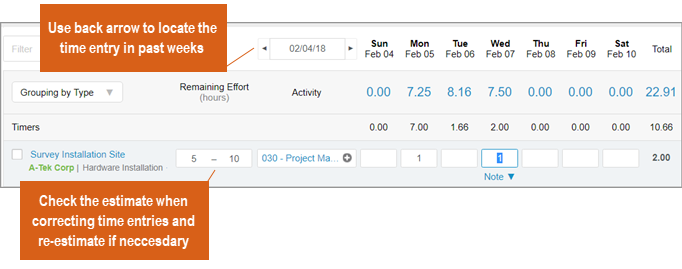
To correct an erroneous timesheet entry, click the date or use the back or forward arrows on either side of the date to navigate to the week where the time was logged.
Click into the cell for the time entry and fix the time entry by entering the correct time value, zeroing-out the time entry, or associate a different activity to the time entry.

Move or Transfer Time Entries
Moving time between tasks is a three-step process. First, use Timesheet Export to pull up a list of all the time entries you need to move.
Then track a corresponding amount of time to the new task or resource to which the time is being moved.
Finally, go back and delete the old time entries using the steps in Editing Previous Time Entries.
Submit Timesheet for Review
Tracking time is essential to keeping the schedule up to date. If your organization requires that you submit your timesheet for review by a manger each week, read on to learn about the timesheet review and approval workflow.
1. After tracking all of your hours for the week, click the Not Submitted button and then Submit to submit your timesheet for review.

2. Once submitted, a Submitted button will appear and your timesheet will go into a “Ready” state, indicating to your manager that your timesheet is ready for review. While in this state, it is still possible for you to re-open and make changes to your timesheet by clicking Submitted > Re-Open.
3. Your manager can then either approve and lock your timesheet, or request an update:
- If your timesheet is approved, an “Approved & Locked” message will display on that week’s timesheet and you’ll no longer be able to edit it. If your manager unlocks your timesheet, it will automatically re-open.
- If your manager requests an update, you’ll receive an email notification with a comment from your manager prompting you to edit your timesheet. This comment will also be visible from your timesheet. Click Needs Update > Re-Open, make the necessary changes, and then Not Submitted > Submit to resubmit it.
Whether your timesheet is approved or not has no influence on how those hours are calculated in Analytics reports or on a Dashboard. Once hours have been tracked to a plan item, the hours are considered logged and are included in reporting.
Group Tasks on the Timesheet
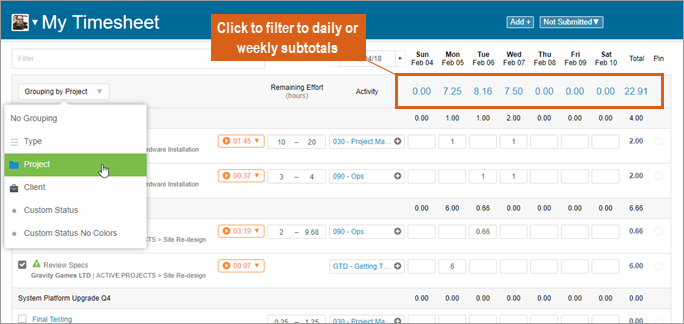
You may group the tasks that appear on your timesheet by client association, project association, and any pick list task custom fields that are set up in your workspace.
- Daily and weekly sub-totals of hours logged appear in blue below each date and also under Week Total. Clicking on these sub-totals will filter your view to just tasks to which time was logged on that particular day or week.
- Depending on how tasks are grouped, sub-totals of hours logged for each grouping will appear within the grouping row, as well as below the Week Total.
- Items with no group will populate at the bottom of the list.
- Groups can be collapsed by clicking the arrow next to each group header.


